Views: 0 Author: Site Editor Publish Time: 2026-07-07 Origin: Site
Forget the relaxing wellness benefits of saunas for a moment. We must look immediately at the operational reality of building one. A poorly installed heater reliably leads to cold floors, constantly tripped high-limit switches, and significant fire hazards. You face a unique physical challenge. Installing a heater in a high-temperature, low-humidity environment demands strict adherence to spatial, electrical, and material guidelines. Heat expansion tests the extreme limits of every structural component. Careful planning prevents catastrophic mechanical failures. To ensure long-term durability and safety, you must align your room preparation with the precise operational requirements of commercial-grade materials. This planning proves especially critical when deploying an SS304 sauna stove. Doing so protects your investment and guarantees a stable, comfortable heat cycle for years to come.
Material matters: Upgrading to an SS304 sauna stove prevents casing degradation and thermal warping caused by extreme temperature fluctuations.
Clearances dictate capacity: Manufacturer-specified safety clearances override aesthetic room designs; spatial planning must start with the stove footprint.
Electrical compliance is non-negotiable: Traditional units require dedicated 240V circuits and high-heat-rated silicone wiring—never standard plug-and-play setups.
Airflow equals efficiency: Proper intake and exhaust ventilation protects the heater's internal sensors from premature tripping and ensures even room heating.
Lower-grade metals pose a serious business problem for facility owners and home builders alike. Materials like 430 stainless steel or galvanized steel inevitably corrode. They warp over time under extreme physical stress. This deterioration accelerates significantly when users introduce water to hot rocks. Splashing water creates sudden, localized humidity spikes inside an otherwise arid environment. These intense moisture spikes aggressively attack weaker metal casings. The repeated cycle of extreme heating and rapid cooling compromises structural integrity. Upgrading your core equipment prevents these early mechanical failures.
Using Grade 304 Stainless Steel provides a highly robust solution. It offers superior oxidation resistance compared to cheaper alternatives. We see how it actively prevents rust formation along the seams. It maintains structural integrity despite rapid thermal expansion. High heat naturally causes metal to expand outward. Rapid cooling causes immediate contraction. A premium casing absorbs these dimensional changes safely. It extends the functional lifespan of internal heating elements. You successfully avoid dangerous cracks along the heater body.
You should always evaluate build materials carefully. Instruct your builders to verify the exact steel gauge and grade. Review the vendor specification sheets thoroughly. Never blindly accept generic marketing claims about stainless construction. Manufacturers sometimes use lower-grade alloys to cut production costs quietly.
| Steel Grade | Corrosion Resistance | Thermal Warping Risk | Recommended Application |
|---|---|---|---|
| Galvanized Steel | Low | High | Budget builds (Not advised) |
| 430 Stainless | Moderate | Medium | Dry use only (No splashing) |
| 304 Stainless | High | Low | Commercial and premium residential |
Site preparation dictates the ultimate success of your heating system. You must distinguish between indoor retrofits and standalone outdoor cabins. An outdoor structure faces aggressive ambient temperature swings daily. A dry steam sauna room behaves differently outside during freezing winter months. You must match the heater's kilowatt rating directly to the room's total cubic footage. Insulation quality also dictates heater size requirements heavily. We measure this insulation capability using standard R-values. Poorly insulated walls require significantly larger heaters to reach target temperatures.
Flooring and vapor barriers require immediate attention during the framing stage. You need a dedicated non-combustible flooring surface directly beneath the heater. Concrete, heavy ceramic tile, or specialized metal pans work best here. Wood floors under a heater present a severe fire risk. You also need continuous foil vapor barriers inside the wall cavities. These barriers reflect radiant heat inward efficiently. They protect sensitive wooden wall studs from deep moisture penetration.
Structural blocking ensures equipment safety and long-term stability. You must pre-frame solid wooden backing inside the wall structures. A wall-mounted heater carries extremely heavy physical loads. Once fully packed, a standard unit holds forty or more pounds of dense rocks. Normal drywall panels cannot support this hanging weight safely. The heavy lag bolts must anchor deeply into solid wood blocks. Failing to install structural blocking causes heaters to rip away from the wall eventually.
Calculate total cubic footage carefully (Length x Width x Height) before selecting hardware.
Upgrade exterior wall insulation to R-13 or higher for optimal heat retention.
Install continuous foil vapor barriers securely on all walls and ceilings.
Secure horizontal 2x4 blocking tightly between studs for safe mounting hardware.
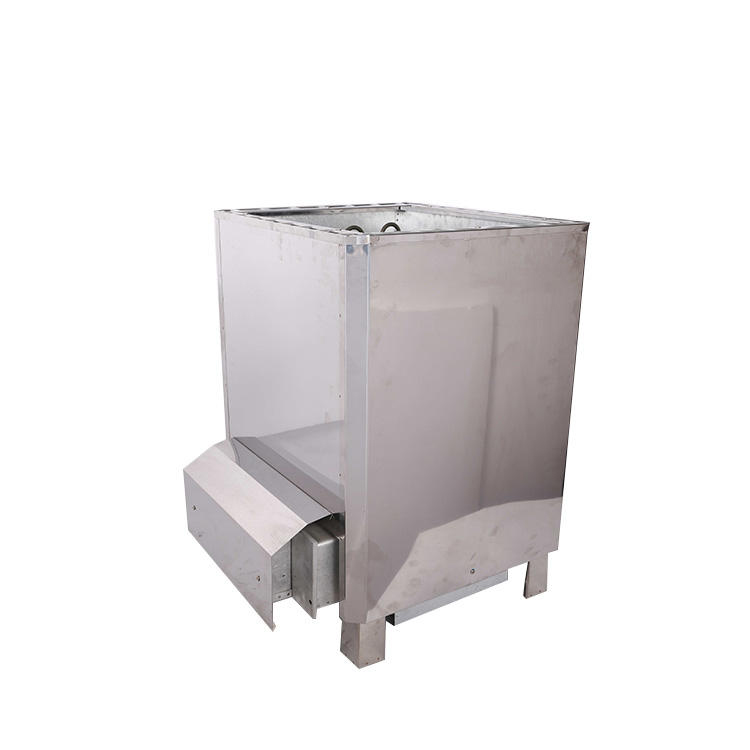
Radiant heat physics govern all spatial dynamics inside the cabin. Every heater features a strict mandatory combustible clearance. Manufacturers typically require two to four inches of empty space from side walls. They also mandate specific minimum ceiling heights directly above the rock tray. Ignoring these required clearance metrics invites spontaneous combustion of adjacent cedar planks.
Safety guards protect users from severe accidental skin burns. You should always build a protective wooden safety guard around the stove. It must meet all minimum clearance requirements strictly. Crucially, the wooden guard cannot obstruct horizontal airflow around the unit. You must leave adequate breathing gaps between the wooden slats. Dense, solid guards trap intense heat immediately around the unit. This trapped heat destroys internal components rapidly and voids manufacturer warranties.
Ceiling heights present very strict dimensional design constraints. You will usually cap traditional room ceilings at exactly seven to eight feet. Heat naturally stratifies due to simple thermal physics principles. It gathers densely near the top of the room. Higher ceilings waste valuable electrical energy unnecessarily. They force your heater to overwork just to warm the lower bench seating areas. Keep ceilings reasonably low to maximize thermal efficiency and overall user comfort.
Almost every modern traditional sauna stove requires a fully licensed electrician for installation. You cannot plug these powerful units into standard residential wall outlets safely. They demand a dedicated 220V or 240V circuit breaker. Connecting a high-draw heater to an overloaded electrical panel causes frequent breaker trips. It also degrades the main panel wiring over several years of use.
High-temperature wiring prevents catastrophic hidden wall fires. Using standard Romex wire inside the hot zone remains a very common failure point. Standard wire insulation melts quickly under sustained extreme heat. You must use 90°C (194°F) or higher rated copper wire strictly. Installers frequently use specialized silicone-coated wire for these final connections. Route this highly specialized wire from the lower junction box directly to the heater terminals.
External controls complicate your electrical wiring setups considerably. We differentiate between simple onboard dials and advanced external digital controllers. Onboard dials keep wiring paths relatively simple. External controllers usually need a separate high-voltage contactor box. You must mount this contactor box entirely outside the heated environment. The sensitive circuit boards inside contactor boxes fail quickly upon exposure to extreme sauna temperatures.
A widespread myth suggests saunas should remain completely airtight spaces. This dangerous misconception ruins the bathing experience entirely. It also damages your expensive heating equipment. An airtight room suffocates the bathers quickly. It prevents the efficient distribution of thermal energy throughout the cabin.
Mechanical airflow relies on proper intake and exhaust vents working synchronously. Position your primary intake vent directly under or closely behind the heater. This lower vent draws in fresh, cold air from outside. The hot metal heating elements instantly warm this incoming air stream. It creates a steady, comfortable updraft throughout the entire cabin. This invisible updraft pushes hot air up toward the ceiling constantly.
Proper exhaust placement prevents frustrating sensor tripping issues. Position the main exhaust vent clearly on the opposite wall. Keep it positioned just below the upper bench level. If you lack an exhaust, heat becomes trapped tightly near the stove. This trapped pocket of intense heat triggers the high-limit safety switch. It causes premature shut-offs long before the room reaches target temperatures. Bathers often mistakenly blame the hardware for these annoying shut-offs. In reality, bad ventilation engineering causes the problem.
You must choose a heating unit based on solid empirical data. Aesthetics matter visually, but robust engineering dictates long-term longevity. Evaluate the build quality and material specifications first. A shiny exterior means nothing if internal components degrade quickly under stress.
Look closely at all required safety certifications. You need verifiable UL (Underwriters Laboratories) or ETL marks. These safety certifications ensure strict building code compliance across North America. Non-certified imported heaters frequently fail local municipal building inspections. They also present severe insurance liability risks for property owners.
Watch out for hidden warranty traps buried in the fine print. Manufacturers routinely void warranties for improper installation procedures. They will instantly deny replacement claims if you skip using a certified electrician. They also void warranties if you pack stones too tightly in the basket. Tight stones restrict essential airflow directly around the heating elements. Elements burn out prematurely without this crucial constant airflow.
Before purchasing your equipment, follow this critical pre-purchase checklist:
Measure your precise cubic footage accurately to determine necessary kilowatt sizing.
Verify your main electrical panel holds sufficient spare amperage capacity.
Confirm you possess enough physical floor space to meet all mandatory clearance requirements safely.
A successful installation relies entirely on careful mechanical synergy. Your heater's engineering must align with precise spatial planning. Choosing durable materials prevents early system degradation. Electrical compliance remains absolutely non-negotiable for personal safety. Taking careless shortcuts on wiring guarantees equipment failure eventually. Ignoring established safety clearances actively invites severe fire hazards into your home or business.
You must act responsibly during the early planning phases. Taking extra time now saves thousands of dollars later. Proper operational planning ensures a reliable, deeply relaxing bathing experience.
Consult a certified electrician early in your design project. Review all technical specification sheets thoroughly before finalizing your room dimensions. Do this important foundational research before you ever purchase a stove.
A: Generally no, unless you use a manufacturer-approved non-combustible floor catch or pan. Direct installation on wood creates a severe fire hazard due to intense radiant heat. Concrete or heavy ceramic tile remains the standard requirement for safe flooring beneath any heater.
A: This happens because the internal high-limit safety switch trips prematurely. Poor ventilation traps intense heat directly around the unit. Alternatively, over-packed rocks restrict essential airflow around the heating elements. Repack the rocks loosely and verify your exhaust vent functions properly.
A: The primary difference involves extreme corrosion resistance. Cheaper metals rust and degrade quickly upon exposure to sudden humidity spikes. SS304 steel prevents thermal warping during intense heat cycles. It ensures your casing maintains structural integrity over years of heavy use.
A: You do not strictly need one for dry steam saunas. However, installers highly recommend adding a floor drain. It makes routine cleaning significantly easier. It also helps manage the small amounts of excess water ladled over the hot rocks during regular use.


